
I’ve been engaged on ending up the trim within the studio, however I’ve been met with some challenges and one of the crucial absurd roadblocks I’ve ever skilled in all of my years of DIYing and reworking. I imply, that is severely one of many dumbest issues I’ve ever encountered. 😀
On a optimistic observe, I’m very glad that I lastly bought this space to the left of the paint swatch cupboard trimmed out.

That space was a problem. I needed to transfer the cupboard out in order that I had room to work again there, and that cupboards is big and heavy. After which, I needed to decide how a lot of every piece of trim needed to be put in in order that the baseboards would lifeless finish into the facet of the cupboard. And as soon as I bought that tiny little bit of baseboard put in, I then needed to transfer the massive, heavy cupboard again into place, ensuring it was comfortable up towards the baseboard with no gaps between the ends of the trim items and the cupboard. I believed I used to be by no means going to get the cupboard in place, however with sheer dedication, endurance, and a rubber mallet that helped me transfer the cupboard that final 1/4-inch, I lastly bought it the place it wanted to be.
I nonetheless need to do the entire caulking and portray, however I believe I can get that half carried out with the cupboard in place.

With that carried out, I believed that I had completed the toughest a part of the trim, however I used to be flawed. Subsequent, I moved to trimming out the doorway that results in the sitting room/breakfast room space. However after I went to put in the half jamb on the studio facet of the pocket door, I couldn’t get the door to maneuver over within the slot sufficient for the 1″ x 2″ jamb piece to connect the place it wanted to go.
After getting a flashlight and looking for the issue, I lastly realized that there have been two issues pushing the door over to the facet. First, there was a random piece of wooden in there. You possibly can see how the door is being pushed over to the studio facet of the pocket.
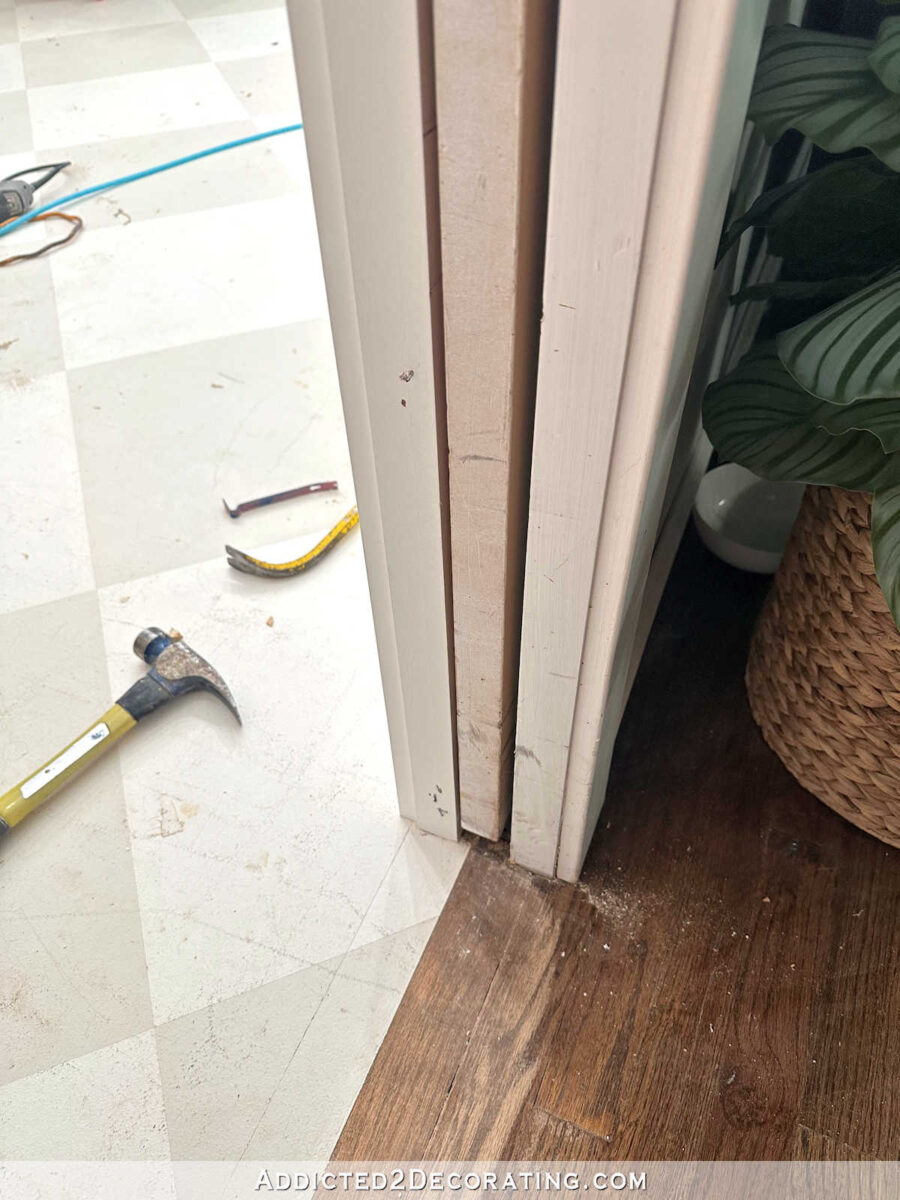
But additionally, there’s a whole roll of painter’s tape contained in the pocket pushing on this facet of the door!!! A whole roll of painters tape!

Y’all! How within the heck did that occur?! How and why is there a whole roll of painters tape contained in the wall? And it’s on the breakfast room facet of the door, so it’s pushing the door over within the slot and affecting the opening and shutting of the door.
I spent about an hour attempting every little thing I might consider to get that roll of painters tape out of there, however I had no success. I imply, I attempted scorching glue on the tip of a paint stir stick, fast dry epoxy on the tip of paint stir stick. However simply as I’d begin pulling the roll of painters tape, the adhesive would launch and the tape would roll again.
The one factor I can consider is that I’ll have to chop a gap within the drywall on the breakfast room facet, take away the painters tape (together with that random piece of wooden), after which patch up the drywall.

That is really one of the crucial absurd and baffling issues I’ve ever needed to take care of in my years of DIYing and reworking. I imply…WHY? HOW? I’ve no rationalization. 😀
However I did handle to maneuver the roll of tape simply sufficient in order that I might proceed with putting in the trim. I bought the door trimmed out, together with that half jamb piece, after which I bought the baseboards put in on the lengthy wall.
And talking of baseboards, I don’t know if I’ve ever shared with y’all my favourite baseboard combo, so right here it’s. First, I set up 1″ x 4″ lumber as the primary baseboard piece.

For this wall, I needed to reduce across the cupboards to make it match. After which I by accident chipped the paint on the cupboard when attempting to get the baseboard into place, so that may want a contact up.

After which, alongside the ground, I add quarter spherical trim. The place the quarter spherical meets the door casing, I reduce the tip of the quarter spherical at a 22.5-degree angle. You may as well use a shoe molding right here, however I are likely to choose the thicker look of quarter spherical.

It will perpetually be my favourite baseboard combo. I really like that it’s a easy, clear look, however it additionally has some weight to the look. I don’t like tiny, skinny, insignificant baseboards. I like them to have some weight to them, with out being too fancy.

After which as soon as they’re caulked and painted, I believe they give the impression of being unbelievable.

Additionally, I at all times paint my quarter spherical to match the baseboards. I do know it’s conventional to match the quarter spherical to the ground in case you have hardwood flooring. I personally don’t ever try this. I don’t like the best way it seems to be in any respect as a result of it makes the baseboards look brief and stubby. I like a tall, substantial baseboard, so portray the quarter spherical to match the baseboards, slightly than staining them to match hardwood flooring, is my choice to beef up the look of the baseboards.
Whereas some flooring installers will let you know there’s completely a proper and flawed option to do it, and the quarter spherical at all times must match the hardwood flooring, I’ll argue that it’s only a matter of private choice, and you are able to do regardless of the heck you wish to do in your individual dwelling. 😀 And I’ll at all times paint my quarter spherical to match the baseboards (or cupboards in these situations the place quarter spherical is used round toekicks and across the backside of cupboards).
Anyway, I haven’t at all times used this model of baseboards, and in reality, many of the remainder of the home has totally different baseboards. After I began reworking this home, I selected a a lot fancier model. Some day, I’d love to return and exchange these fancier baseboards with this straightforward model.

Addicted 2 Adorning is the place I share my DIY and adorning journey as I transform and enhance the 1948 fixer higher that my husband, Matt, and I purchased in 2013. Matt has M.S. and is unable to do bodily work, so I do nearly all of the work on the home on my own. You possibly can study extra about me right here.


